The Irresistible Allure of Homemade Croutons: A Culinary Game-Changer
Imagine a vibrant, fresh green salad. Now, picture it without that satisfying crunch, that burst of savory flavor that elevates every forkful. It's like a symphony missing its crescendo, isn't it? This is precisely the difference that homemade croutons make. Far from being mere breadcrumbs, a well-crafted batch of croutons transforms everyday meals into extraordinary culinary experiences. They are not just a garnish; they are an essential element, offering a textural and flavorful counterpoint that store-bought varieties simply can't match.
The journey to perfect homemade croutons begins with a simple truth: the most basic ingredients—bread, fat, and seasoning—can yield remarkable results. However, the real secret lies in understanding these components, particularly your choice of bread, and how to coax the best out of each. Once you've mastered the art, you'll find yourself reaching for these crispy, herb-infused, and perfectly oil-kissed bites not just for salads and soups, but as an irresistible snack all on their own. Trust us, resisting their charm is a futile endeavor!
The Foundation: Choosing Your Bread Wisely for Superior Croutons
The quest for perfect homemade croutons hinges significantly on your choice of bread. This isn't a task for flimsy, soft sandwich slices; rather, it calls for a bread with character, structure, and a good crumb. Think of it as laying the foundation for a sturdy, flavorful building.
Why Sturdy Bread is King
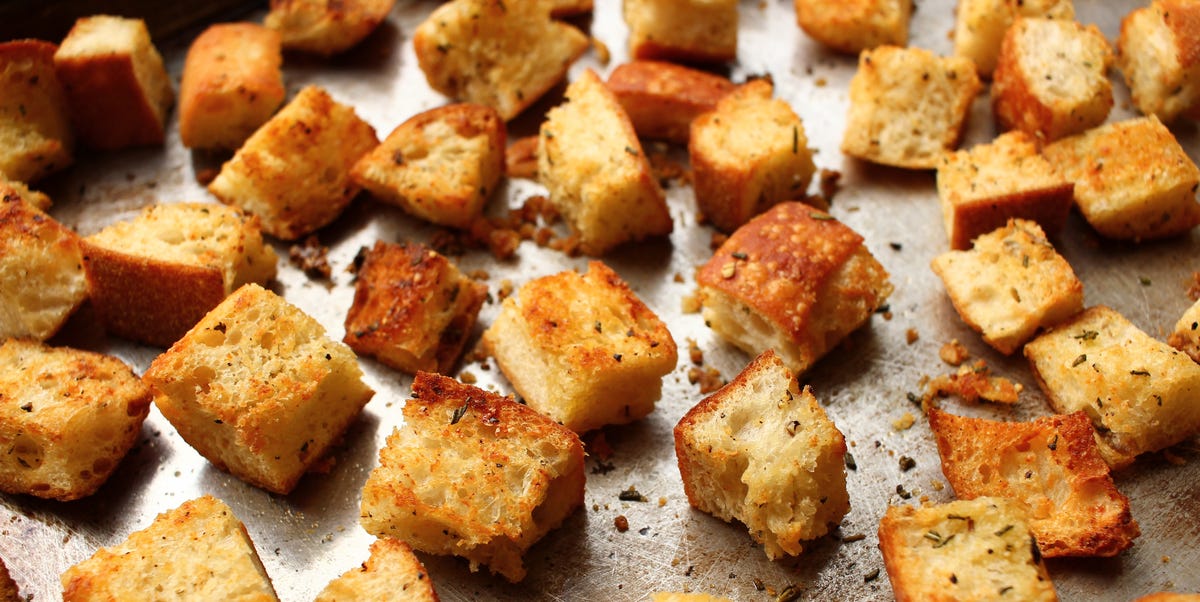
The ideal bread for croutons is one that can withstand the baking process, absorbing fats and seasonings without collapsing into a greasy mess. It needs to hold its shape, developing a beautifully crisp exterior while maintaining a satisfying, slightly chewy interior. This textural contrast is what separates a truly great crouton from a merely acceptable one.
- Sourdough: Its distinct tang and robust crust make for exceptionally flavorful and sturdy croutons. The open, irregular crumb allows for excellent absorption of flavorings.
- Artisan Loaves: Breads with a dense crumb and a substantial crust, often found at bakeries, are fantastic. Their inherent structure prevents them from becoming too hard or crumbly.
- Italian or French Bread: Classic choices like baguettes, ciabatta, or rustic Italian loaves provide a good balance of crust and crumb, ensuring a desirable texture. Ciabatta, with its airy interior, creates craggy, irregular croutons that are wonderfully rustic.
- Homemade Bread Bowls: If you've recently baked bread bowls, the leftover bread is a prime candidate for transforming into croutons, repurposing what might otherwise go to waste.
What to Avoid: Steer clear of super-soft, airy sandwich breads. While convenient, they tend to absorb too much oil, becoming overly greasy and lacking that desirable crispy-chewy balance. They often crumble rather than crisp evenly.
The Freshness Factor: Finding the Sweet Spot
Contrary to popular belief, using super stale, rock-hard bread isn't the secret to the best homemade croutons. While staleness might be ideal for breakfast casseroles, French toast strata, or bread puddings where the bread needs to absorb a lot of liquid, it results in croutons that are simply too tough and can even be tooth-breakingly hard. The key is finding a happy medium:
- Fresh or 1-Day-Old Bread: This is the prime candidate. Bread that's just a little bit firm, but not brittle, allows for the perfect crisping without sacrificing that delicate chewy center. The slight drying helps it become porous enough to absorb the oil and seasonings effectively.
- A Few Days Old: If your bread is a bit older, that's fine too, as long as it's not rock-hard. Simply adjust your baking time slightly, keeping an eye on it to prevent over-drying.
Preparation: To Tear or To Cube?
The way you break apart your bread largely depends on your aesthetic preference and desired texture profile:
- Tearing for Rustic Charm: Tearing the bread into pieces yields wonderfully craggy, irregularly shaped croutons. This variation in size and shape means you'll get a delightful mix of textures – smaller, crispier bits alongside larger, slightly chewier pieces. It adds a beautiful, rustic appeal to any dish.
- Cubing for Uniformity: For a more polished, uniform look, slice your bread into even cubes. Aim for roughly ½-inch to ¾-inch pieces. This ensures more consistent cooking and a consistent texture throughout the batch.
Regardless of your method, ensure the pieces are small enough to fit comfortably on a fork or spoon alongside their accompanying salad or soup. Large, unwieldy croutons can be a nuisance!
Crafting Culinary Magic: Fats, Seasonings, and Flavor Profiles
With your ideal bread selected and prepared, the next crucial step in making exceptional homemade croutons is imbuing them with rich flavor. This involves a strategic combination of fats and seasonings that transform simple bread into something truly special.
The Power Duo: Olive Oil and Melted Butter
While you can certainly use just olive oil or just melted butter, the culinary magic truly happens when you combine both.
- Olive Oil: Provides a robust, savory base and contributes to an incredibly crispy exterior. It also has a higher smoke point than butter, which is beneficial for baking.
- Melted Butter: Infuses the croutons with a rich, nutty, and irresistible flavor that olive oil alone cannot replicate. It adds a depth of taste and a certain luxuriousness.
The synergistic blend offers the best of both worlds: the crisping power of oil with the delectable flavor of butter. Aim for a ratio that allows the butter's flavor to shine without making the croutons overly greasy.
Seasonings: Beyond Just Salt
Salt is essential, but it's just the starting point for flavor. This is where you can truly personalize your homemade croutons. The possibilities are endless:
- Classic Herb Blend: Garlic powder, onion powder, dried oregano, dried thyme, and a touch of black pepper. This blend is versatile and complements almost any savory dish.
- Italian Flair: Add dried basil, a pinch of red pepper flakes, and a generous grating of Parmesan cheese (either mixed in before baking or sprinkled on during the last few minutes).
- Spicy Kick: Incorporate smoked paprika, cayenne pepper, or more red pepper flakes for a warming, zesty flavor.
- Mediterranean Touch: A sprinkle of dried rosemary, a little lemon zest, and perhaps some sumac can transport your taste buds.
- Fresh Herbs: If you have fresh parsley, chives, or rosemary, chop them finely and add them to the oil mixture. For delicate herbs like fresh basil, it's often best to toss them with the hot croutons immediately after they come out of the oven to preserve their vibrant flavor and color.
Pro Tip: Heating the olive oil, melted butter, and your chosen dry seasonings in a small saucepan or skillet until the butter melts and the mixture is well combined helps the flavors meld. Drizzling this warm, aromatic blend over the bread cubes ensures more even absorption and distribution, leading to a more intensely flavored crouton.
The Art of the Perfect Crunch: Tossing and Baking Techniques
Once your bread is cut and your flavorful fat mixture is ready, it's time to bring it all together and achieve that coveted crisp-chewy texture that defines stellar homemade croutons.
Thorough Coating is Key
After drizzling the seasoned oil and butter mixture over your bread pieces, take the time to toss them thoroughly. You want every single piece to be fully coated. This ensures even browning and consistent flavor in every bite. A large bowl is ideal for this step, allowing you to gently but effectively toss the bread without crushing it.
Baking for Optimal Texture
Spread the coated bread pieces in a single layer on a parchment paper-lined baking sheet. Crowding the pan will lead to steamed croutons rather than crispy ones, so if necessary, use two baking sheets.
Baking at a moderate temperature allows the croutons to slowly dry out and crisp up without burning. While exact times can vary based on your oven and the bread's moisture content, a common approach is to bake for about 10 minutes, then stir them gently, and continue baking for another 5-8 minutes, or until they reach a beautiful golden brown color.
- Monitor Closely: The transition from perfectly golden to burnt can happen quickly. Keep a watchful eye, especially towards the end of the baking time.
- Listen for the Crunch: As they get closer to done, you might hear a faint crackling sound as the moisture escapes and the bread crisps.
- The Ideal Result: You're aiming for a crouton that is crunchy on the outside, offering resistance when you bite into it, but still has a slightly softer, satisfyingly chewy center. They should not be rock-hard.
Once baked to perfection, remove the croutons from the oven and let them cool completely on the baking sheet. They will continue to crisp up as they cool, developing that irresistible crunch. For a comprehensive guide on achieving this perfect crispness every time, be sure to check out our article: Easy Homemade Croutons: Crispy, Buttery, Chewy Perfection.
Beyond the Salad Bowl: Creative Uses & Storage Solutions
The beauty of homemade croutons extends far beyond their traditional role in salads. Their versatility, combined with their incredible flavor, makes them a valuable asset in any kitchen.
Versatile Culinary Enhancements
While a classic Caesar salad or a comforting bowl of tomato soup are undoubtedly elevated by homemade croutons, don't stop there:
- Soup Topping: Beyond creamy tomato, consider French onion soup, roasted red pepper soup, or even a hearty minestrone.
- Roasted Vegetables: Toss them with roasted asparagus, Brussels sprouts, or green beans for added texture and flavor.
- Pasta Dishes: Sprinkle over pasta with garlic and oil, or a light primavera for a delightful crunch.
- Eggs and Breakfast: Crush them slightly and use as a topping for scrambled eggs or an omelet, or even as a crunchy element in a savory bread pudding.
- Snack Time: Perhaps the most dangerous (and delicious) use! Homemade croutons are incredibly addictive on their own. They make an amazing snack for movie night or an afternoon pick-me-up. For more innovative ways to enjoy these crunchy delights, explore Beyond Salads: Why Homemade Croutons are Your Next Snack.
Storage Tips for Lasting Freshness
To keep your homemade croutons fresh and crispy, proper storage is essential:
- Cool Completely: Ensure they are entirely cool before storing. Storing warm croutons will trap moisture and make them soggy.
- Airtight Container: Transfer cooled croutons to an airtight container. This protects them from humidity, which is their nemesis.
- Room Temperature: Store the container at room temperature on your counter or in a pantry.
- Shelf Life: Properly stored homemade croutons will typically remain fresh and crispy for 5-7 days. While they might last a bit longer, their quality will start to decline.
Embrace the Homemade Difference
The journey from a humble loaf of bread to a batch of perfect homemade croutons is a rewarding one. By understanding the importance of your bread choice, embracing the power of flavorful fats and seasonings, and mastering a few simple baking techniques, you unlock a world of culinary possibilities. Not only will you elevate your salads, soups, and other dishes, but you'll also discover a new favorite snack that's far superior to anything store-bought. So, choose your bread wisely, gather your ingredients, and get ready to transform your meals with the irresistible crunch and flavor of truly perfect homemade croutons.
